Wednesday, October 15, 2008

Toy Store Progress

Well, I've made some progress on the toy store - still have some things to finish, but can give you a good idea of what it's going to look like. I'm having probs resizing on photobucket lately, so if they are too large to fit on the screen, please keep checking back!

Entire store so far - I've added the floor for the attic, as well as a couple extra goodies to show that the attic will be a storage space.

toy store so far

Little House on the Prairie books - these were made for me by Grace Shaw. She also made the first six Trixie Belden books for me, that are displayed in my Memory House.

miniature little house books

Bead toys:

bead toys

Mr. Potato Head

miniature toys

Saturday, September 27, 2008

The Toy Store is Getting a New Home!

Last spring, I found a wonderful wooden box sitting on a curb here in town. This box was too wonderful to be neglected and thrown out, so I picked it up and brought it home. It's been sitting here waiting patiently to become something other than a "catch all". The hinged lid has a checker/chess board on both sides, which it what finally made me decide it would work well as the toy store. I'm excited to finally have a scene I'll be able to keep the cats out of! LOL

Tonight, I'm cleaning the box thoroughly and deciding on wall paper. It will have a small attic space that will be papered with newsprint. The downstairs, which is the actual store, I'm still undecided on. I'm wanting to get this done in just a couple days time, so wish me luck! (Then, it can be on to the fun of making new counters, toys, shelves, etc.)

I'll have pictures to post in just a little while. See you then!

Tuesday, September 23, 2008

A Couple Old Projects

I guess I'll never get all my projects on here! Everytime I think I've posted them all, I find a couple more I missed! LOL

Actually, I'm not absolutely certain that I missed the toy store, but in scrolling back, I can't find a picture of it anywhere. So, here it is again. The roombox is made of foamcore, it was a group project I lead on my yahoo group.

Photobucket

I made a lot of the toys, as well as the shelves and the counters. The bead toys were especially fun! I used a polymer clay base and colored paperclips for the wires. The beads are made from polymer clay as well. They were a bit tricky to figure out, but after quite a bit of trial and error, I found a way to make it work. I'm seriously thinking about writing an article for AM on doing a toy store - step by step.

Tuesday, June 10, 2008

Ice Cream Parlor

I finally have made some progress with this project! It feels wonderful!! The last couple days I've been rearranging the counters and such. I also wanted to add some color to it. I still have some work to do, but am pleased to finally have some pictures to share! I'll add signs tomorrow, at least that's the plan!

dollhouse miniature ice cream

dollhouse miniature ice cream

dollhouse miniature ice cream

Wednesday, June 04, 2008

More Projects

I found a few more pictures of projects that I haven't posted yet, so here goes! lol

This is the picnic set up on the deck of the Newberg:
Photobucket

This is the apartment on the top floor of my bakery. I play around with this quite a bit, trying to find the perfect placement for everything.
Photobucket

This is the Delaney, my first landscaping project. Not too bad for a first try, right?
Photobucket

This is the concession stand I made to be given as a prize in a hospitality contest at work. What a lucky winner!
angled view

This last picture is a mini jello I made from TLS. Tanya taught me this little trick. I filled my mold with TLS and baked according to directions. When it was still a bit warm, I carefully removed it from the mold. Once completely cool, I painted it with gallery glass. I need to get some other colors - like green! lol
Photobucket

I made it to the doctor today. I'm now waiting for some test results. Continue to keep your fingers crossed!!

Tuesday, June 03, 2008

Miscellaneous

I'm going through my photobucket account to see what pics/scenes I haven't mentioned on here yet. There's just a few, so we'll put them all in one post and then I'll be caught up and ready to move forward!

The first is my Thanksgiving scene in a cornacopia. This scene, with a how-to, was published in the Nov 2007 issue of American Miniaturist. I no longer remember where I came up with the idea, but it's one that I just love. I like the unusual containers for scenes and this was my first. This picture was taken on Sept. 26, 2006.

Photobucket

This next one is a Valentine's scene that I did in February 2007 for a contest in a forum I used to belong to.

This is the view without the cover to the gazebo on:
valentines,chocolate

This is with the cover on:
Photobucket

This is a little bakery stand I did as a group project last fall on my yahoo group. I gave it to my friend, Bonnie.

Photobucket

I've been wiped out the last week or so, haven't been able to work on any of my projects, which is why we're still seeing my previous scenes. I'm going in to the doctor tomorrow to get checked for anemia, thyroid, whatever to see if we can find what's wrong.

Tuesday, May 27, 2008

The Jellybean

Today, we'll see the "Jellybean", a large dollhouse Jerry built me from scratch to keep me busy. Unfotunately, the Jellybean has met with an accident and is patiently waiting for me to rebuild it. Once I get to it, many of the rooms will receive a complete new look. Here is what it used to look like, though:


master bedroom:

Photobucket


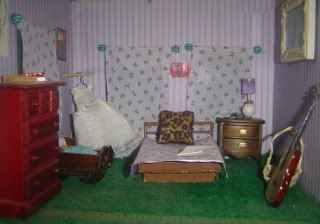
The picture on the right wall is a miniaturized picture from our vow renewal in June 2004. The lampshade is made from a cover from a tube at the doctor's lab. They came in to take my blood and I asked for a tube in return. She thought I was crazy, til I told her why I wanted it! Now, whenever she sees me, I get one automatically! The wedding dress I made in an online class a few years ago. I no longer remember who taught the class, so I can't give proper credit.
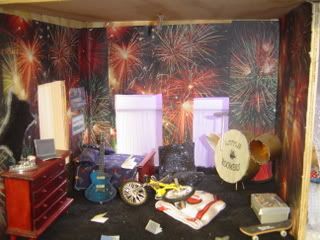


Eddie's room:

When Jerry told me he was building this monster-huge house for me, I got very excited. The kids have all been bugging to make them their own mini bedrooms and this house gave me the chance. I let each of them choose wallpaper, etc. for their rooms. Eddie had wanted flames, but we couldn't find anything he liked. So, he settled for this paper. He also insisted that his mini room be messy like his real room.
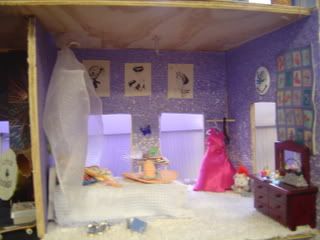


Photobucket


Melaina's room:

Melaina LOVES Point of Grace, a Christian pop band. So, her room has a lot of pictures of them, all their "cd's", etc. Melaina made the yellow teddy bear herself out of fimo. She is becoming quite the miniaturist herself!


Mels Room Oct 14 2006


Ashleigh's room:

Ash's favorite book as a little girl was Good Night Moon. She still has a copy of that book that she loves and she wanted it included in her room. So, I made a miniature version of it - printed thoughout. There is also a plate of spaghetti in there, because it's her favorite food. Her love of butterflies is reflected in the quilt on the wall and also the butterfly on the wall.
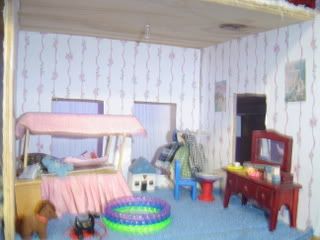


Photobucket


Katrina's room:

Katrina is Jerry's daughter, whom we rarely get to see. Not knowing a lot about her, I just went for a little girl's look. The bed in this picture was eventually replaced, but I don't have a new pic.
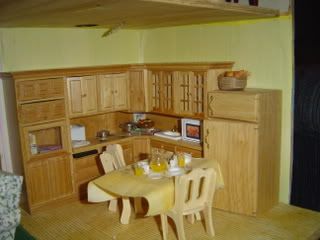


Photobucket


Kitchen:

I bought the cupboards off of ebay. When the house is rebuilt, I plan to put food on the plates. There is now corned beef and cabbage in a pan on the stove. This room is going to undergo a lot of changes when the house is done.
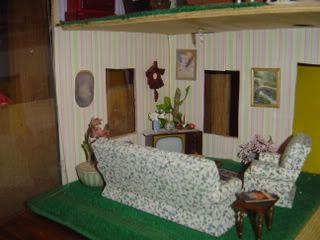
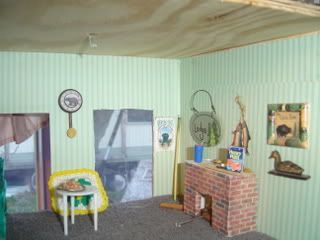


Jellybean Kitchen Oct 14 2005


Living Room:

The pic on the wall is my Dad and his brother when they were very small. The tv is a salt and pepper shaker I found at an antique shop. I've since seen them on ebay for double what I paid for this one.
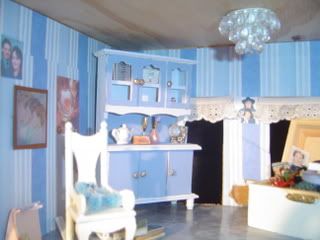


Jellybean Living Room Oct 14 2006


Memory Room:

There are so many fun things in this room!!! It won't be a memory room when the house is rebuilt, because I now have a memory house and many of these things have been moved to it. But, I'll tell you what you're seeing. In the middle of the top shelf of the hutch is a replica of my Dad's box of ashes. He passed away when I was 11, and my five brothers and sisters were all younger than me. Mom had him cremated and we kept his ashes at home, which was a great comfort to us all. The other object on the top shelf is a miniaturized version of my brothers memorial card. He passed away in 2004 from lupus. The small brown object on the "counter" of the hutch is a replica of a small wooden box we bought Dad for his last Father's Day - it says "Dad" on the top of it. Not seen in this picture, but next to the chair are some Trixie Belden books. I loved this series as a young girl - still do to this day. I made a couple miniature versions. In the Memory house, I have mini versions of the first six books in the series, made by Grace from TreeFeathers. I love her books - she is so talented! On the wall between the windows is a picture of my brother (the one who passed away in 04) and I. The drawing on the left wall is a mini version of a drawing that was done of my husband and his brothers when they were young. There's also a pic of Jerry and I, as well as mini McDonalds ad.

Replica of Dad's ashes

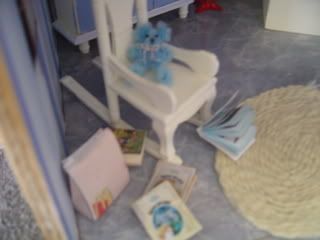
Ok, so this picture shows the Trixie books! You can also see the trunk and the table in this one, so I can continue to tell you why some things are in this room. The cowboy hat in the trunk is another memory of Shawn, it's just like the one he always wore, as you can see in the picture. There's a pic of the McDonalds where Jerry and I met, as well as the first house we lived in. A mini wedding album is by the chair, and the table holds a lot of pics of the kids, us, etc. The teapot and silver tea set is a memory of drinking tea with my Gran the last time we were at her house. Jerry's mom has always had gumball machines, which is why I included one in here.

Trixie!

Den:
This room was done just to give me a place to put a bunch of items I received in a log cabin swap! LOL Unfortunately, I no longer remember who made what, or even what group it was for.
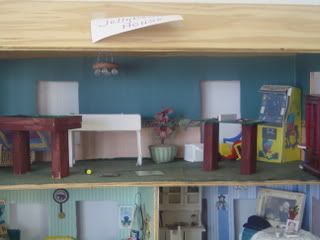
oct 5 05

Game room:
Checkers, Pac Man, air hockey, pool and ping pong, they have it all!

game room with pool and ping pong table

Put it all together!
This is an interior view of the entire house, to give you an idea how big it is.

Entire Jellybean house

Sunday, May 25, 2008

The Newberg

On January 31, 2003, Jerry came home with a Newberg kit that he had picked up for $20.00 at a truck stop in MN somewhere. This is the first house I built after a year break. Now that I'm getting ready to set up my display, I will be re-doing the nursery in this house, hopefully the bathroom, too. Here's what it looks like right now.

Here are the rooms, in no particular order:
Music Room:
Photobucket

Kitchen:
Photobucket

Living Room:
Photobucket

Bedroom:
Photobucket

Bathroom:
Photobucket

Nursery: (can you see why I want to re-do it??)
Photobucket

I'd welcome any suggestions for the nursery (or any other room!)

Mini McDonalds

I met my husband while working at McDonalds in Dodge City, Kansas. Since then, McDonalds has always had a special place in my heart, as silly as that sounds. A couple years ago, I made a roombox of the Dodge City restaurant, complete with the stagecoach booth they have.

Photobucket

Photobucket

Photobucket

Keep checking back, because as I plan for this years' dollhouse display uptown, I'll post pics of former projects. Some of them, I'll re-do before the display.

Planning the Next Display

Today was my son's graduation. I'm so proud of him! So, my minis have been waiting for me to get back to them. Guess that'll happen tomorrow.

For the next month, I'm going to be preparing for the annual display that I do in uptown Watertown. There's a store on "main street" with HUGE windows that I have been asked to display my houses in once a year. That occured in July last year, so I'm planning for the same this year. I need to check out each house and see what needs to be fixed, changed, etc. One thing I want to do is a new nursery in the Newberg. There's some repairs that needs to be done to my Mexican restaurant. My cats got ahold of it not too long ago. I also need to finish building the porch of the Adams, which is the new home for my hacienda.

Thursday, May 22, 2008

Ice Cream Parlor

Well, I'm not doing so great with the daily posts! I'm truly sorry and I'll try to do better.

My most recent project is an ice cream parlor. I found the tuts for it quite some time ago online. I've been wanting to make it, but have always had other projects going on. I'm doing it as a group project for my yahoo group. We're having great fun with it. It's the first project I've done in awhile that I get to keep for myself, which is very exciting! Although as a group, we're only to the counters, I've found some extra time and have gotten some of my ice cream treats done as well. It's just as cute as I had thought it would be! But, don't take my word for it, see for yourself.

bucket of ice cream!

Photobucket

I would gladly post a link to where I found the original directions, but the page is no longer there. I'm very glad that I saved them when I first found them.

Sunday, April 20, 2008

Caught up - sorta! ;)

Ok, all my posts from my other blog have been moved here. Now, I will daily post about current projects, etc., as well as try to add about projects I did before I ever started that blog. Eventually, all the pics, etc. from my website will also be here and I'll have everything in one place. Sounds wonderful, doesn't it???

"Tamales" progress

Jun 20 2007, 09:16 PM
First, a special thank you to my friends at Greenleaf who have helped me in naming the Mexican Restaurant! I love it!I'm having great fun with this project, did I say that already?? LOL!

This is what I have so far - complete with some food on the tables. I used some of the tacos and burritos I had made previously, but added a couple things and tonight am working on some more. I made some fajitas, because when I go to "Guadalajaras", that's what I always order. It's one of my favorite Mexican dishes. This was fairly easy - first, I made a small ball of red clay and cut it into wedges, for tomatoes. I did the same with translucent for onions. I made some small pieces of meat using a mixture I came up with when attempting the leg of lamb from Sue Heaser's book. I twisted these a bit to give the shape. Then, I added some green clay as green bell peppers. I baked these, then I made a mixture of TLS and brown pastels. I mixed the baked clay into this, then sprinkled it with black pastel, to represent pepper. I re-baked. Then, I placed that in a pan I had made from clay and covered it with varnish. I was quite pleased with how this turned out.

Photobucket

Photobucket

Last night, I started on the drinks for the patrons of my lil restaurant. I made margaritas for them. I used the plastic "bowl" from the lock on a bakery container for the main part of the glass. A couple beads made the stem and a circle punched from the bakery container with a reg hole punch served as the base. I should have used superglue, but I was out and didn't feel like going to the store. So, I used hot glue, which worked great, but I'm still trying to get all the strings off of it! For the actual margarita, I mixed clear nail polish, clear gallery glass and light green pastel. This mixture, when first made, has the consistency of snot! Pretty nasty! Boy, I had fun teasing my kids with it!! LOL I filled the bowl of the glasses and set them aside to set up. Worked like a charm!

Photobucket

Tonight, I am working on making tamales. If that's the name of the restaurant, well, there has to be some tamales in there!!! It took me a bit to come up with a way to get the texture on these right, but think I succeeded. I have a couple more to make, then I can bake them and we'll see how they turned out. I'm using ecru colored clay (premo sculpy). I rolled it out and cut it into sections. I placed some brown clay in the center and rolled the ecru around it. Then, I rolled the outside around a bottle cap to get the ridge pattern. This worked better than trying to put each line into the clay individually! Then, I used a pin at the edges to give a bit of texture to both the "masa mixture" and the "meat". They look fairly good to me, but I'll post pics later so you all can judge. After the tamales, I plan to try Spanish rice. Wish me luck and cross your fingers! I am still doing some thinking about chairs. I have a tut around here to make chairs from film cannister lids. Unfortunately, I haven't had a roll of film in this house in over three years, ever since we switched to digital. I posted to free cycle tonight, because I was too lazy to go to either Express Photo or even Walmart to see if I can get some from either place. Not only lazy, but both places are a nice distance from the house and I try not to waste gas. Might go ahead and go to Express tomorrow, since I have to take my daughter that direction anyway. Trying to think of a way that I can make the chairs and keep with the same colors/patterns I already have in the restaurant.

My Mexican Restaurant

I'm really having a great time with this project! Mother Necessity came by and helped me come up with some beautiful "tiled" tables that I am very happy with! Because we are trying to save every cent we can, I'm doing this project all with supplies I have on hand, with the exception of the foamcore. I found some punch outs, from the Newberg I think, that I decided to use for tables. I drew a checkerboard design on them, then painted in each square with either green, red or yellow. I gave it a turquoise border and covered the whole thing with polyurethane. With the exception that not all of my lines are perfectly straight, I love the results. I used the bottom half of a Michael's hutch for the front counter. I did the top the same way I did the tables, and painted the rest with the same colors. I found some brightly colored birds in my bead container. Not sure what their intended use was, but they look great on the walls. I'm still working on the trim, so there's still some places that look pretty rough yet. I balance the parts I don't like (trim) with the parts I do (decorating). I'm still trying to decide what I have that I can make the chairs from and if it would be too crowded to put a table or two in the center. I can't decide about the tables until I get the other three tables all in. Here's what it's looking like so far though.

Photobucket

Tonight I had to make a barbecue for a class I'm teaching tomorrow. We're doing the barbecue in honor of Father's Day. It's basically a trash-to-treasure project, but it turns out pretty cute. I'm gonna make a few steaks to throw on it.

Photobucket

Photobucket

Mini Catch up

Jun 14 2007, 08:37 PM
Well, it's been forever again! I can't believe I used to be quite faithful at journalling! I started a Mexican restaurant last week, out of foamcore. My reasoning is that since I can't start building another house, a foamcore project gives me something to do without "building". It's just a one room structure that won't have a roof, although it will have the beams. When I did the hacienda, I found some texturized spray paint in the perfect adobe color that I used. I, unfortunately didn't have any left, so I had to get creative. I found an acrylic paint in the perfect color, Apple Barrel Creamy Peach #20582. But, I had to figure out how to get the texture to it. Our Walmart recently added a lot of craft items, one of them being craft sand. So, I bought some and experimented. I mixed quite a bit of the sand into the paint and tried it out. It worked wonderfully! I was quite pleased with the effect I acheived. I'm using craft sticks for paint, with Apple Barrel Laguna for the color. That's as far as I've gotten so far. I can't believe this project is taking me so long, but I managed to get sick with a kidney infection, which really slowed me down. I did finally get back to it today, though.

Making a Photo Cake

May 22, 2007I am making a graduation roombox as my daughter's graduation present. The first challenge I had was recreating her photo cake. I've never even seen one in miniature before, so I didn't know who to ask or how to begin. I took the bull by the horns last night and was very pleased with the final result!

Photobucket

This is before the added trim frosting:

Photobucket

No matter how I tried, I couldn't get a decent picture of the final project. But, you can see how it turned out when I added all the frosting squiggleys on the sides. The real cake had a few more colors, but I didn't want to clutter this one up, so stopped at two.

DuraCraft Sierra

May 25, 2007I received a nice surprise in the mail on Tuesday. A friend of mine sent me the Sierra by DuraCraft! I was so thrilled and immediately started working on it! It was sent to me to give me an idea of how to do a cabin like this for a mini weekend I'm helping with for another forum. I was surprised at how quickly and easily it went together. In fact, if it weren't for drying time, I might have finished it the same day. I didn't think to take pictures during the building process, but I do have pictures of the "final" project. I plan to follow Joann Swanson's directions to texture and color the "logs", so I haven't done that yet. I have to go on a small shopping spree first.

Photobucket

Photobucket

Tonight I started making a table for the cabin. I'm using dowels for the edges of the table and slightly larger dowels for the legs. I used a pocket knife to whittle away parts of the dowels to give them a log-look. I'm using a piece of basswood for the table and the smaller dowels will go all around the edges of that. When I have it together, I will stain the whole thing. I'll post pics of it later on. If it works out, then we'll use this table as part of the project at the mini weekend. Now I'm on the hunt for a pattern for a stove to use for the cabin as well. The bed was made with scraps of the "logs" from the cabin and another piece of basswood. It was pretty easy and we've decided to use it, too.