Sunday, April 20, 2008
Caught up - sorta! ;)
Ok, all my posts from my other blog have been moved here. Now, I will daily post about current projects, etc., as well as try to add about projects I did before I ever started that blog. Eventually, all the pics, etc. from my website will also be here and I'll have everything in one place. Sounds wonderful, doesn't it???
"Tamales" progress
Jun 20 2007, 09:16 PM
First, a special thank you to my friends at Greenleaf who have helped me in naming the Mexican Restaurant! I love it!I'm having great fun with this project, did I say that already?? LOL!
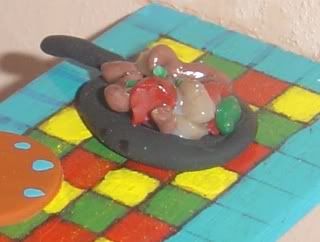
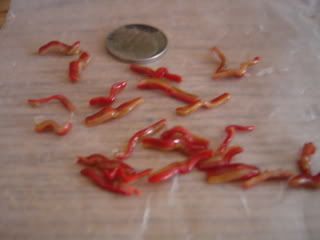
This is what I have so far - complete with some food on the tables. I used some of the tacos and burritos I had made previously, but added a couple things and tonight am working on some more. I made some fajitas, because when I go to "Guadalajaras", that's what I always order. It's one of my favorite Mexican dishes. This was fairly easy - first, I made a small ball of red clay and cut it into wedges, for tomatoes. I did the same with translucent for onions. I made some small pieces of meat using a mixture I came up with when attempting the leg of lamb from Sue Heaser's book. I twisted these a bit to give the shape. Then, I added some green clay as green bell peppers. I baked these, then I made a mixture of TLS and brown pastels. I mixed the baked clay into this, then sprinkled it with black pastel, to represent pepper. I re-baked. Then, I placed that in a pan I had made from clay and covered it with varnish. I was quite pleased with how this turned out.
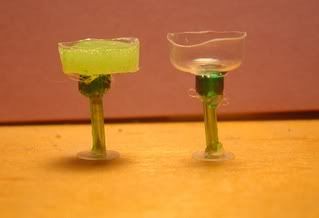
Last night, I started on the drinks for the patrons of my lil restaurant. I made margaritas for them. I used the plastic "bowl" from the lock on a bakery container for the main part of the glass. A couple beads made the stem and a circle punched from the bakery container with a reg hole punch served as the base. I should have used superglue, but I was out and didn't feel like going to the store. So, I used hot glue, which worked great, but I'm still trying to get all the strings off of it! For the actual margarita, I mixed clear nail polish, clear gallery glass and light green pastel. This mixture, when first made, has the consistency of snot! Pretty nasty! Boy, I had fun teasing my kids with it!! LOL I filled the bowl of the glasses and set them aside to set up. Worked like a charm!
Tonight, I am working on making tamales. If that's the name of the restaurant, well, there has to be some tamales in there!!! It took me a bit to come up with a way to get the texture on these right, but think I succeeded. I have a couple more to make, then I can bake them and we'll see how they turned out. I'm using ecru colored clay (premo sculpy). I rolled it out and cut it into sections. I placed some brown clay in the center and rolled the ecru around it. Then, I rolled the outside around a bottle cap to get the ridge pattern. This worked better than trying to put each line into the clay individually! Then, I used a pin at the edges to give a bit of texture to both the "masa mixture" and the "meat". They look fairly good to me, but I'll post pics later so you all can judge. After the tamales, I plan to try Spanish rice. Wish me luck and cross your fingers! I am still doing some thinking about chairs. I have a tut around here to make chairs from film cannister lids. Unfortunately, I haven't had a roll of film in this house in over three years, ever since we switched to digital. I posted to free cycle tonight, because I was too lazy to go to either Express Photo or even Walmart to see if I can get some from either place. Not only lazy, but both places are a nice distance from the house and I try not to waste gas. Might go ahead and go to Express tomorrow, since I have to take my daughter that direction anyway. Trying to think of a way that I can make the chairs and keep with the same colors/patterns I already have in the restaurant.
First, a special thank you to my friends at Greenleaf who have helped me in naming the Mexican Restaurant! I love it!I'm having great fun with this project, did I say that already?? LOL!
This is what I have so far - complete with some food on the tables. I used some of the tacos and burritos I had made previously, but added a couple things and tonight am working on some more. I made some fajitas, because when I go to "Guadalajaras", that's what I always order. It's one of my favorite Mexican dishes. This was fairly easy - first, I made a small ball of red clay and cut it into wedges, for tomatoes. I did the same with translucent for onions. I made some small pieces of meat using a mixture I came up with when attempting the leg of lamb from Sue Heaser's book. I twisted these a bit to give the shape. Then, I added some green clay as green bell peppers. I baked these, then I made a mixture of TLS and brown pastels. I mixed the baked clay into this, then sprinkled it with black pastel, to represent pepper. I re-baked. Then, I placed that in a pan I had made from clay and covered it with varnish. I was quite pleased with how this turned out.


Last night, I started on the drinks for the patrons of my lil restaurant. I made margaritas for them. I used the plastic "bowl" from the lock on a bakery container for the main part of the glass. A couple beads made the stem and a circle punched from the bakery container with a reg hole punch served as the base. I should have used superglue, but I was out and didn't feel like going to the store. So, I used hot glue, which worked great, but I'm still trying to get all the strings off of it! For the actual margarita, I mixed clear nail polish, clear gallery glass and light green pastel. This mixture, when first made, has the consistency of snot! Pretty nasty! Boy, I had fun teasing my kids with it!! LOL I filled the bowl of the glasses and set them aside to set up. Worked like a charm!

Tonight, I am working on making tamales. If that's the name of the restaurant, well, there has to be some tamales in there!!! It took me a bit to come up with a way to get the texture on these right, but think I succeeded. I have a couple more to make, then I can bake them and we'll see how they turned out. I'm using ecru colored clay (premo sculpy). I rolled it out and cut it into sections. I placed some brown clay in the center and rolled the ecru around it. Then, I rolled the outside around a bottle cap to get the ridge pattern. This worked better than trying to put each line into the clay individually! Then, I used a pin at the edges to give a bit of texture to both the "masa mixture" and the "meat". They look fairly good to me, but I'll post pics later so you all can judge. After the tamales, I plan to try Spanish rice. Wish me luck and cross your fingers! I am still doing some thinking about chairs. I have a tut around here to make chairs from film cannister lids. Unfortunately, I haven't had a roll of film in this house in over three years, ever since we switched to digital. I posted to free cycle tonight, because I was too lazy to go to either Express Photo or even Walmart to see if I can get some from either place. Not only lazy, but both places are a nice distance from the house and I try not to waste gas. Might go ahead and go to Express tomorrow, since I have to take my daughter that direction anyway. Trying to think of a way that I can make the chairs and keep with the same colors/patterns I already have in the restaurant.
My Mexican Restaurant
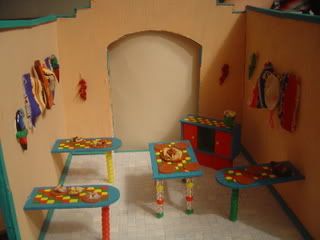
I'm really having a great time with this project! Mother Necessity came by and helped me come up with some beautiful "tiled" tables that I am very happy with! Because we are trying to save every cent we can, I'm doing this project all with supplies I have on hand, with the exception of the foamcore. I found some punch outs, from the Newberg I think, that I decided to use for tables. I drew a checkerboard design on them, then painted in each square with either green, red or yellow. I gave it a turquoise border and covered the whole thing with polyurethane. With the exception that not all of my lines are perfectly straight, I love the results. I used the bottom half of a Michael's hutch for the front counter. I did the top the same way I did the tables, and painted the rest with the same colors. I found some brightly colored birds in my bead container. Not sure what their intended use was, but they look great on the walls. I'm still working on the trim, so there's still some places that look pretty rough yet. I balance the parts I don't like (trim) with the parts I do (decorating). I'm still trying to decide what I have that I can make the chairs from and if it would be too crowded to put a table or two in the center. I can't decide about the tables until I get the other three tables all in. Here's what it's looking like so far though.

Tonight I had to make a barbecue for a class I'm teaching tomorrow. We're doing the barbecue in honor of Father's Day. It's basically a trash-to-treasure project, but it turns out pretty cute. I'm gonna make a few steaks to throw on it.


Tonight I had to make a barbecue for a class I'm teaching tomorrow. We're doing the barbecue in honor of Father's Day. It's basically a trash-to-treasure project, but it turns out pretty cute. I'm gonna make a few steaks to throw on it.


Mini Catch up
Jun 14 2007, 08:37 PM
Well, it's been forever again! I can't believe I used to be quite faithful at journalling! I started a Mexican restaurant last week, out of foamcore. My reasoning is that since I can't start building another house, a foamcore project gives me something to do without "building". It's just a one room structure that won't have a roof, although it will have the beams. When I did the hacienda, I found some texturized spray paint in the perfect adobe color that I used. I, unfortunately didn't have any left, so I had to get creative. I found an acrylic paint in the perfect color, Apple Barrel Creamy Peach #20582. But, I had to figure out how to get the texture to it. Our Walmart recently added a lot of craft items, one of them being craft sand. So, I bought some and experimented. I mixed quite a bit of the sand into the paint and tried it out. It worked wonderfully! I was quite pleased with the effect I acheived. I'm using craft sticks for paint, with Apple Barrel Laguna for the color. That's as far as I've gotten so far. I can't believe this project is taking me so long, but I managed to get sick with a kidney infection, which really slowed me down. I did finally get back to it today, though.
Well, it's been forever again! I can't believe I used to be quite faithful at journalling! I started a Mexican restaurant last week, out of foamcore. My reasoning is that since I can't start building another house, a foamcore project gives me something to do without "building". It's just a one room structure that won't have a roof, although it will have the beams. When I did the hacienda, I found some texturized spray paint in the perfect adobe color that I used. I, unfortunately didn't have any left, so I had to get creative. I found an acrylic paint in the perfect color, Apple Barrel Creamy Peach #20582. But, I had to figure out how to get the texture to it. Our Walmart recently added a lot of craft items, one of them being craft sand. So, I bought some and experimented. I mixed quite a bit of the sand into the paint and tried it out. It worked wonderfully! I was quite pleased with the effect I acheived. I'm using craft sticks for paint, with Apple Barrel Laguna for the color. That's as far as I've gotten so far. I can't believe this project is taking me so long, but I managed to get sick with a kidney infection, which really slowed me down. I did finally get back to it today, though.
Making a Photo Cake
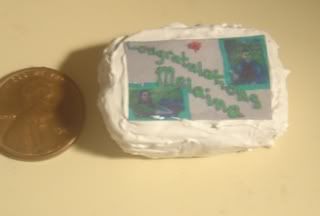
May 22, 2007I am making a graduation roombox as my daughter's graduation present. The first challenge I had was recreating her photo cake. I've never even seen one in miniature before, so I didn't know who to ask or how to begin. I took the bull by the horns last night and was very pleased with the final result!
This is before the added trim frosting:
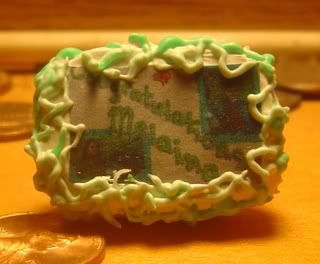
No matter how I tried, I couldn't get a decent picture of the final project. But, you can see how it turned out when I added all the frosting squiggleys on the sides. The real cake had a few more colors, but I didn't want to clutter this one up, so stopped at two.
DuraCraft Sierra
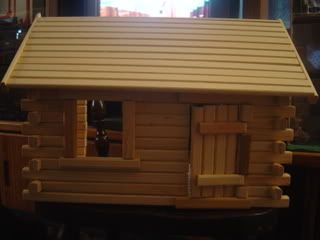
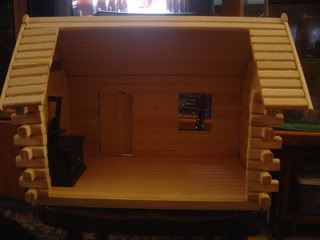
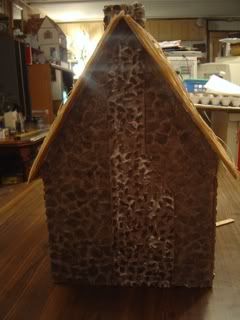
May 25, 2007I received a nice surprise in the mail on Tuesday. A friend of mine sent me the Sierra by DuraCraft! I was so thrilled and immediately started working on it! It was sent to me to give me an idea of how to do a cabin like this for a mini weekend I'm helping with for another forum. I was surprised at how quickly and easily it went together. In fact, if it weren't for drying time, I might have finished it the same day. I didn't think to take pictures during the building process, but I do have pictures of the "final" project. I plan to follow Joann Swanson's directions to texture and color the "logs", so I haven't done that yet. I have to go on a small shopping spree first.
Tonight I started making a table for the cabin. I'm using dowels for the edges of the table and slightly larger dowels for the legs. I used a pocket knife to whittle away parts of the dowels to give them a log-look. I'm using a piece of basswood for the table and the smaller dowels will go all around the edges of that. When I have it together, I will stain the whole thing. I'll post pics of it later on. If it works out, then we'll use this table as part of the project at the mini weekend. Now I'm on the hunt for a pattern for a stove to use for the cabin as well. The bed was made with scraps of the "logs" from the cabin and another piece of basswood. It was pretty easy and we've decided to use it, too.


Tonight I started making a table for the cabin. I'm using dowels for the edges of the table and slightly larger dowels for the legs. I used a pocket knife to whittle away parts of the dowels to give them a log-look. I'm using a piece of basswood for the table and the smaller dowels will go all around the edges of that. When I have it together, I will stain the whole thing. I'll post pics of it later on. If it works out, then we'll use this table as part of the project at the mini weekend. Now I'm on the hunt for a pattern for a stove to use for the cabin as well. The bed was made with scraps of the "logs" from the cabin and another piece of basswood. It was pretty easy and we've decided to use it, too.
My First TLS (transluscent liquid sculpy) experiments
May 16, 2007When I had to take my daughter down to Sioux Falls about a month ago, I finally was able to find some TLS. I've read lots about ways ppl have used this, but hadn't had the chance to give it a try for myself. So far, I've successfully made frosting and a lemon pie using it. I have a "stew" in the oven right now, we'll see how that turns out! If it's ok, I'll add a pic of it as well. My pie needs a bit more filling, but this serves to show what it turned out like - for now.

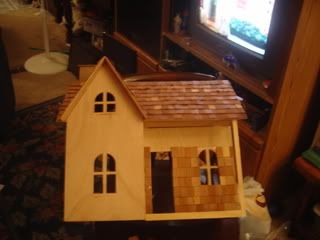
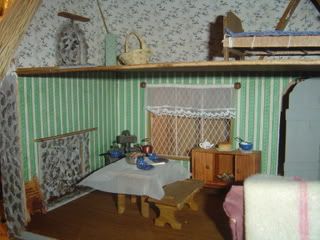
Jerry is building my haunted house kit - it finally made it's way out of the box!! He's doing it as a rustic cottage, with the exterior walls all done in shingles. I don't know how he has the patience, but it's turning out awesome! We already have a lot of the little goodies for the inside, once he gets that far. Here are a couple pictures of the progress on this one.

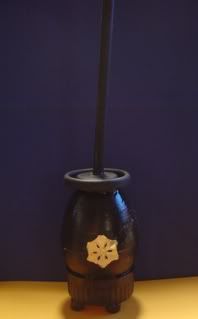
I also finally managed to try to make Holly's parlor stove. Here's a pic of my efforts. Holly, you made this an easy, fool-proof project. Thank you!

Feb 2007
Feb 2007 - Well, let's see if I do any better at blogging this time. I want to keep track of my mini projects, what I do and when, etc. It's a rather bad time in life right now, but I have done a few minis. Last week (on 3/18/07) I made some St. Patricks Day cakes,
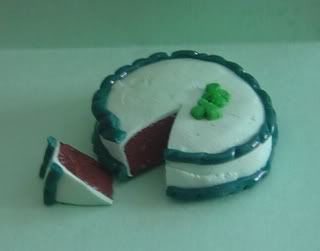
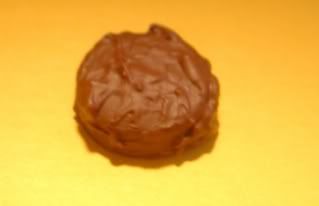
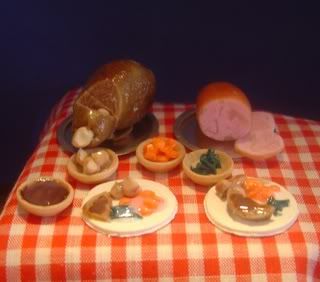
a cherry pie (that I still need to add a crust to), and some cheesecakes. A few weeks ago is when I was successful at making a complete leg of lamb dinner - the meat didn't turn out quite as pink as I would've liked, but it did have wonderful texture and the bone looked remarkably real! I had made all the various vegetables before and it was really no big deal. This pic was taken 2/5/07.
Monday, I finally had the chance to try making some bacon, which I was really pleased with. It turned out wonderfully. This was made 2/17/07.

a cherry pie (that I still need to add a crust to), and some cheesecakes. A few weeks ago is when I was successful at making a complete leg of lamb dinner - the meat didn't turn out quite as pink as I would've liked, but it did have wonderful texture and the bone looked remarkably real! I had made all the various vegetables before and it was really no big deal. This pic was taken 2/5/07.

Monday, I finally had the chance to try making some bacon, which I was really pleased with. It turned out wonderfully. This was made 2/17/07.

Recovering from Surgery
March 5, 2007 - My surgery was the 22nd. I'm doing ok. They put a partial cast on my arm this time. Dr. told Jer that they had to do a lot of "digging" around the tendon and veins. It hurts a lot - more than I let on. No mini work for awhile still and typing is still very difficult.
Teaching???
May 25 2007, 01:31 PM
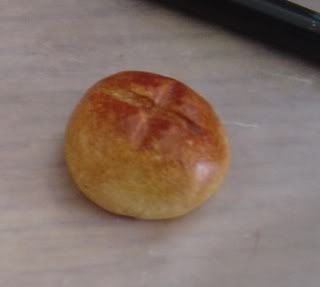
I am teaching my first class tomorrow - online. I can't believe that I am doing this - I don't see myself as good enough to teach others. It's a polymer clay bread class, and I have done lots of breads. Tonight, I went ahead and made some more, taking pictures of each step to post on the board during the class. I must say, I got the color better tonight than I have ever managed before. I made a shelf to go in the bay window of my bakery today - I'll put my pies there and will have more room on the other shelves for breads and cakes and such. Pictures will follow tomorrow when I finally get the shelf put in. Progress is slow on my Sugarplum. I'm excited about the house, but there are some real life issues going on right now that are dampening my spirit on it. Hope things straighten out soon!
I am teaching my first class tomorrow - online. I can't believe that I am doing this - I don't see myself as good enough to teach others. It's a polymer clay bread class, and I have done lots of breads. Tonight, I went ahead and made some more, taking pictures of each step to post on the board during the class. I must say, I got the color better tonight than I have ever managed before. I made a shelf to go in the bay window of my bakery today - I'll put my pies there and will have more room on the other shelves for breads and cakes and such. Pictures will follow tomorrow when I finally get the shelf put in. Progress is slow on my Sugarplum. I'm excited about the house, but there are some real life issues going on right now that are dampening my spirit on it. Hope things straighten out soon!
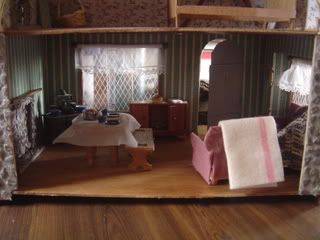
Sugarplum progress and a few bonus items
May 25 2007, 01:32 PM
Tonight I stopped procrastinating and started the egg carton "stone work" on the Sugarplum. I am genuinely surprised at how it's turning out so far. I have one entire wall done - the one with the chimney. I plan to do the chimney different, somehow, so have left it alone for the time being. I also got started on the front wall, behind the porch. I don't want to do the rest of it until I get the window box put on the window. I opted for using my pastels for coloring, which was a pain, but turned out well. I didn't make it to the craft store to find paint in the color I wanted and I didn't want to put it off any longer!
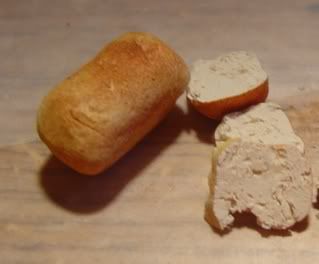
Yesterday's class went very well. I was pleased with the turn out and the pictures I've seen of bread people made. I made Irish soda bread during class, because I had already made regular bread the night before in order to take pictures to post along with the steps. I really love the way they turned out and I can't wait to finish my cottage so at least one of them can take their rightful place in the Irish kitchen! The other might stay in the bakery.
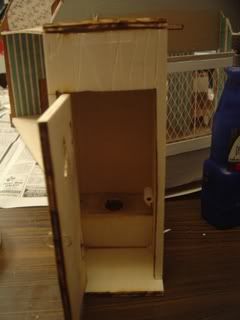
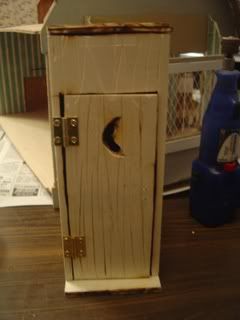
Awhile back, I saw a package of wood pieces at Walmart. I snatched them up, because our Walmart isn't going to be carrying them much longer. They just sat here until Jerry asked me if I had plans for them. I told him no, so he decided to use them to make an outhouse. I tell ya, it was so much fun to sit working on the egg carton stones on the Sugarplum with him at the same table working on this outhouse. I think it turned out pretty cute, although we do still need to weather it. I felt like a queen when he made it for me!


More progress on the Irish cottage
May 25 2007, 01:33 PM
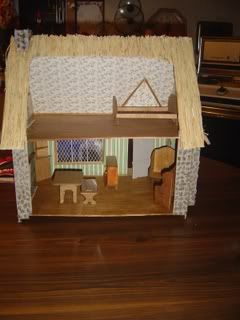
Last night I finished the front of the cottage. My fingers sure are getting sore from tearing the egg carton to make those small stones!! I still love the way it's turning out, though. It's well worth it! The benches on the front porch are also finished now. Today, I put the back wall, bay window roof and back roof on as well. I bought the stain and craft sticks for doing the floors and haven't quite decided which I want to do first - floor or roof.
Last night I finished the front of the cottage. My fingers sure are getting sore from tearing the egg carton to make those small stones!! I still love the way it's turning out, though. It's well worth it! The benches on the front porch are also finished now. Today, I put the back wall, bay window roof and back roof on as well. I bought the stain and craft sticks for doing the floors and haven't quite decided which I want to do first - floor or roof.

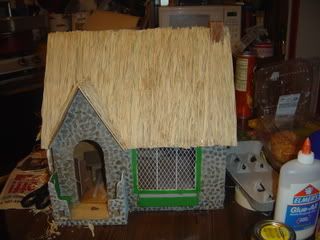
Beginning the Roof
April 20, 2007
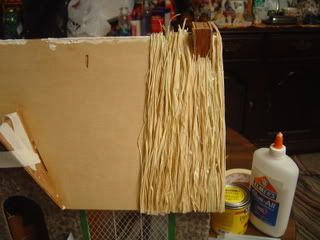
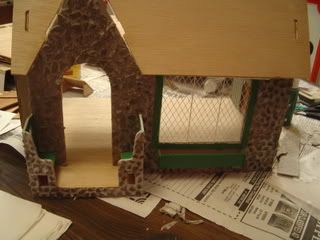
This is the beginning of the roof of the Irish Cottage. You know, I still need to come up with a better name for it! I found a tut somewhere using hot glue and raffia, so that's what I'm using. For now, I am gluing it at the top, in the middle and at the bottom. I looked at the tut long enough to get a general idea, then adapted it to what works for me, which means at first it was trial, error and a bit of screaming! I am doing it in very small sections - maybe 1/4 inch. I put the hot glue on the top and then push the raffia into the glue with a small stick. (this is the result of trial and error and many burns!) I have to hold it a few seconds to get all the pieces in the small bundle to get into the glue and stay. I pull it downward firmly and repeat the process in the middle of the roof, then the bottom. I put a few bunches of raffia on each section for the bulk. As you can see, I still have a ways to go to decide how to do the seams going across the entire roof. Haven't quite figured that out just yet, but I can refer back to that tut. I also stained the floors today, but not sure if I am happy with the results or not. Might have to go back and do that part differently. The gable is now in place, the chimney is finished (built) and all the furniture that came with the kit is done. The only "building" I have left to do is the fireplace trim inside the house. I stained the mantles, but need to stone the rest, which I might get to tomorrow.

This is the beginning of the roof of the Irish Cottage. You know, I still need to come up with a better name for it! I found a tut somewhere using hot glue and raffia, so that's what I'm using. For now, I am gluing it at the top, in the middle and at the bottom. I looked at the tut long enough to get a general idea, then adapted it to what works for me, which means at first it was trial, error and a bit of screaming! I am doing it in very small sections - maybe 1/4 inch. I put the hot glue on the top and then push the raffia into the glue with a small stick. (this is the result of trial and error and many burns!) I have to hold it a few seconds to get all the pieces in the small bundle to get into the glue and stay. I pull it downward firmly and repeat the process in the middle of the roof, then the bottom. I put a few bunches of raffia on each section for the bulk. As you can see, I still have a ways to go to decide how to do the seams going across the entire roof. Haven't quite figured that out just yet, but I can refer back to that tut. I also stained the floors today, but not sure if I am happy with the results or not. Might have to go back and do that part differently. The gable is now in place, the chimney is finished (built) and all the furniture that came with the kit is done. The only "building" I have left to do is the fireplace trim inside the house. I stained the mantles, but need to stone the rest, which I might get to tomorrow.
Finished the Irish Cottage!
April 22, 2007
I finished construction of Delaney Cottage a couple nights ago. I stayed up pretty late to do it, but I thought I was so close!!! Here are the pics of the finished construction.
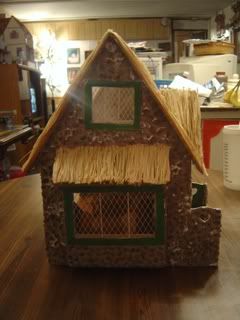
I finished construction of Delaney Cottage a couple nights ago. I stayed up pretty late to do it, but I thought I was so close!!! Here are the pics of the finished construction.


Cottage has a Name!
April 24, 2007
I have been driving myself about insane trying to come up with a name for my Irish cottage. I wanted a simple, Irish name for it and nothing I was coming up with sounded good to me. Out-of-the-blue yesterday, the name came to me. It's now the "Delaney Cottage". Delaney was my brother's middle name, which is the biggest reason I chose it. I ran across the name in a book I was reading and thought, "how perfect! now it can be named after Shawn!" My family seems to like it as well.Worked some more on the stones last night. Have the top of the bay window wall left to do, as well as the two back walls. Then onto the chimney. The floors are done and I really like the way they look. I should be able to finish it today, just as long as I get to it! I think I'll use most of the furniture that came with the kit in the cottage, adding a few things as well. Can't wait to start putting it together! Have decided that I will definately landscape this house. Had already decided to put it on a base with a turntable. After all the work I've put into the outside of the house, it would be a shame not to be able to admire it as well, right? But, I really thought that it would look pretty strange to have it sit on a plain base, so I have to landscape it, don't you think?? The more plans I make for this house, the more excited I get about it. One thing I've decided from doing this house - it's so much more fun to do a themed house rather than just building it and putting whatever into it! That's pretty much what I did with the Newberg and the Jellybean. Oh, the Jellybean is a dream house for my family and kinda themed house, but not like this one, or the Orchid. I am also working on the story to go with the cottage, because it's so much fun to do. That's something that I learned from the Greenleaf forum and I'm so grateful for it!!
I have been driving myself about insane trying to come up with a name for my Irish cottage. I wanted a simple, Irish name for it and nothing I was coming up with sounded good to me. Out-of-the-blue yesterday, the name came to me. It's now the "Delaney Cottage". Delaney was my brother's middle name, which is the biggest reason I chose it. I ran across the name in a book I was reading and thought, "how perfect! now it can be named after Shawn!" My family seems to like it as well.Worked some more on the stones last night. Have the top of the bay window wall left to do, as well as the two back walls. Then onto the chimney. The floors are done and I really like the way they look. I should be able to finish it today, just as long as I get to it! I think I'll use most of the furniture that came with the kit in the cottage, adding a few things as well. Can't wait to start putting it together! Have decided that I will definately landscape this house. Had already decided to put it on a base with a turntable. After all the work I've put into the outside of the house, it would be a shame not to be able to admire it as well, right? But, I really thought that it would look pretty strange to have it sit on a plain base, so I have to landscape it, don't you think?? The more plans I make for this house, the more excited I get about it. One thing I've decided from doing this house - it's so much more fun to do a themed house rather than just building it and putting whatever into it! That's pretty much what I did with the Newberg and the Jellybean. Oh, the Jellybean is a dream house for my family and kinda themed house, but not like this one, or the Orchid. I am also working on the story to go with the cottage, because it's so much fun to do. That's something that I learned from the Greenleaf forum and I'm so grateful for it!!
Taco Tut
May 14, 2007
TACOS AND TORTILLA CHIPS
personal use only please
You will need:polymer clay - translucent, ochre, white, brown, red, yellow, orange, pottery
varnish
½ inch round cutter
ochre artist pastel
TORTILLAS:Mix 1 part ochre, ½ part white, and ¼ part translucent clay.

Roll out to about 1/16 of an inch. (I used third setting on my pasta machine) Cut out circles with your ½ inch cutter.

Gently rub ochre pastel on a piece of paper. For tacos, rub pastel onto one side of each circle. If you wish to make flat tortillas or chips, rub both sides with color.

If you are making tacos, you’ll want to gently fold each circle over to form a shell shape.

Bake for 10 minutes on 275. While still warm, if you are making chips, cut each circle into chips. I cut each circle in half both ways, then cut each piece in half.

Lightly coat pieces with varnish and let dry.

FILLING:Roll a very thin snake of brown clay.

Take a piece of the snake and “bunch it up” to a size to fit in your taco shell. Keep the shape of the snake clearly defined.

Make sure they fit easily into the taco shell, so you can glue it in place after baking.

Bake.TOPPINGS:tomatoes: mix translucent with a trace of red. Roll into thin snake and bake.While warm, cut into tiny pieces.onions: roll translucent into thin snake and bake.While warm, cut into tiny pieces.lettuce: mix translucent with a trace of leaf green.Roll very thin and tear into tiny pieces.Bakecheese: mix ¾ part yellow and ½ part orange clay.Roll into thin snake and bake.While warm, cut into tiny pieces.PUTTING IT ALL TOGETHER:After gluing the filling into your shells, you simply glue the other toppings to the filling. I mixed my tomatoes and onions together with a bit of glue and applied those with a toothpick. I also used the toothpick to place the lettuce . After the glue dries a bit, then I used a toothpick to place some cheese.
Paper Roses Tut - Part 2
April 28, 2007
1:12 Scale Paper Roses
personal use only, pleaseYou will need:

sheet of paper in color you would like your rose
heart punch
floral wire
Elmer’s glue
tooth pick
Step 1:Punch out several hearts from your paper. You will need about 8 - 10 hearts per rose.
Step 2:Cut a piece of floral wire. You’ll only want it an inch at the end, but you can cut it longer to make it easier to work. It’s easy to cut it down later.
Step 3:Fold a heart in half, lengthwise and unfold. You will do this with every heart you use for your roses. Use a toothpick to place glue along the crease. Glue to the top of your piece of wire.


4:Put just a bit of glue at the bottom of the crease of your next heart.

You’ll want to attach this heart to the heart already on your wire. You’ll want the round part of this heart to be on the side of the flat part of the first one.

Step 5.Put glue on the bottom of the crease of your next heart. Glue to the bottom of your budding rose, off to one side. Repeat on the other side.

Paper Roses Tut - part 2
April 28, 2007
Step 6.Glue your next heart along the "seam" formed by the last two hearts. Repeat on the opposite side of your bud.

Repeat Steps 5 and 6 one or two times, until your rose has as many petals as you would like for it to have. Let dry.

Step 7.Once dry, gently shape each "petal" by bending, slightly curling, etc.

Subscribe to:
Comments (Atom)